
Strap yourselves in with functional 3D printed parts!
One of the best parts about working for an industrial strength 3D printing company is that you always have access to create strong and functional parts whenever an idea strikes. Over the past two years, there’s been a sharp rise in the prevalence of functional 3D printed parts showing up in our employees’ lives – from toothbrush and pen holders, to replacement Kevlar door hinges (we’re not totally sure how unnamed parties lost a door hinge…), and a GPS mount for road bicycle handlebars to name just a few. It’s incredibly easy to make custom, high-strength, one-off components with a Mark Two 3D printer, and with a large in-house printer farm continuously requiring new parts to test the performance of our machines, it’s common to see your design materialize rapidly.
This was the case when Maggie, one of our mechanical engineers, wanted to upgrade her bicycle pannier to make it easier to transport. Panniers are (generally waterproof) bags that mount on either side of the front or rear wheels of a bicycle, as you can see in the image below. Panniers are also a common sight around the Markforged offices – a significant portion of our office bikes to work and they’re a great solution to transporting gear to and from the office.

Panniers sometimes have backpack or over-the-shoulder straps, but not often, and Maggie found it unwieldy to lug her fully loaded pannier around when she was transporting it off her bicycle. Undeterred, she decided to design a solution that would take advantage of both the high tensile strength of our Kevlar CFF filament, and the print-and-forget reliability of the Mark Two. This allowed her to quickly iterate through a series of functional designs before producing two finished high strength shoulder strap adapters with minimal impact on her busy engineering schedule (just planning and running nearly the entirety of print testing of our new HSHT Fiberglass composite filament, no big deal!).

The adapter allowed an off-the-shelf duffel bag shoulder strap to be attached to the plastic clips which normally hold the pannier onto a steel bicycle rack on the rear of the bike. The pannier clips were the perfect mounting point for adding a shoulder strap but the strap itself terminated in its own set of plastic clips which couldn’t interface with the pannier at an angle that was comfortable to wear the bag. It was clear to Maggie that an adapter would be necessary to get this project moving.

The first iteration was made with the rough dimensions of the mounting points of both the pannier and shoulder strap clips. It was functional, but the round hole for mounting the shoulder strap was too thick and the strap’s clip couldn’t move smoothly, which made for awkward positioning when carrying the bag.

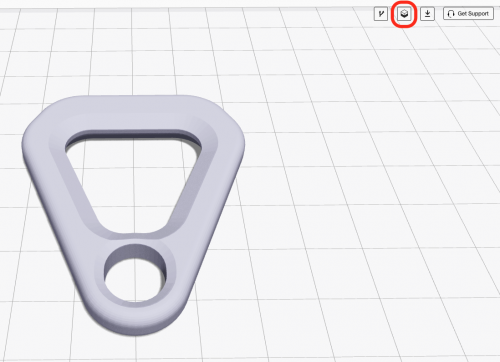
In the second iteration, Maggie reduced the size of the strap clip hole and redesigned the overall adapter body to have a slimmer, sleeker design that fit better with the design aesthetic of the bag and strap. With one click, she updated the STL file to be sliced, using the ‘Update STL’ button in Eiger (highlighted in red in the image below). She also switched the fiber type to Kevlar, because it is able to retain more of its tensile strength than fiberglass or carbon fiber, in the event that an overloaded bag deforms the part itself.
The final design iteration didn’t involve any change in geometry, and in fact used the same STL file, but instead required a change in slicing settings. Maggie liked how the part had come out, but she wanted a stronger part than was printed in the second iteration. She modified the Eiger settings to incorporate fiber in all layers, rather than just a few in the top and bottom of the part, for an overall stronger part.

With the final iteration complete, Maggie printed out another copy and assembled the bag below. Functional parts – right off the printer!

All of the blogs and the information contained within those blogs are copyright by Markforged, Inc. and may not be copied, modified, or adopted in any way without our written permission. Our blogs may contain our service marks or trademarks, as well as of those our affiliates. Your use of our blogs does not constitute any right or license for you to use our service marks or trademarks without our prior permission. Markforged Information provided in our blogs should not be considered professional advice. We are under no obligation to update or revise blogs based on new information, subsequent events, or otherwise.
Never miss an article
Subscribe to get new Markforged content in your inbox