New Tools for Customizing Fiber Layout Deliver Cost-Efficient Strength
Reinforcing 3D-printed parts with continuous fibers — such as fiberglass or carbon fiber — is a valuable manufacturing capability. It allows users to easily print parts that are much stiffer and stronger than parts made from only plastic. When adding fiber to a part, users have a few decisions to make: the type of fiber fill (concentric or isotropic), how much fiber to use, and where in the part to put the fiber.
While default fiber settings work well for many applications, certain scenarios call for manual fiber placement. Fiber overrides grant more control over fiber placement — allowing users to customize fiber settings for specified layers.
Historically, these customized fiber override settings could only be applied to entire layers. In response, we are announcing a new capability — fiber override sketching — which allows users to control fiber placement within each layer.
Why use fiber override sketching?
This new capability provides more control over fiber routing. Users can selectively reinforce key features on their parts without reinforcing the entire part or layer. This unlocks more efficient utilization of continuous fibers — which in turn can reduce material costs.
The workflow is simple: create a fiber override, add a sketch, and the fiber routing will update automatically.
Using Simulation in tandem with this new capability can expedite the process of finding and validating the requisite amount of fiber needed to ensure part performance.

Example workflow
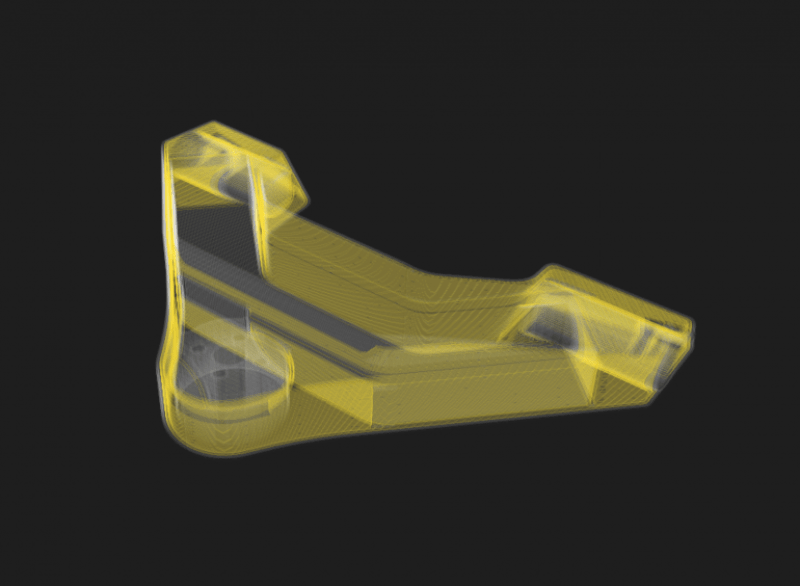
Consider the part shown below, a fixture for an optical breadboard.
The objective is to figure out which print settings result in a part that meets or exceeds its Safety Factor requirement — while minimizing material costs, as 250 of these parts will be manufactured.

The part must be able to withstand a maximum load of 400 N without failing. A target Safety Factor of 1.5 accounts for uncertainties in the loading, and helps ensure the part doesn’t fail in service.
To start, the user can validate performance of the baseline part — which uses default settings for Onyx — with Simulation. The minimum Safety Factor is 1.06, which fails to meet the requirement of 1.5.

To increase strength, the user can add continuous fiberglass to the part in all layers and with isotropic routing. After this strength boost, Simulation predicts a Safety Factor of 2.74. While this part is now much stronger than the default part, it comes at a cost — the material cost and print time have also increased significantly.
Since the Safety Factor is far higher than it needs to be, there is an opportunity to reduce the amount of fiberglass — and significantly reduce the material cost. This is where fiber override sketching comes in handy.
Using fiber override sketching, fiberglass is only added to the region of the part that benefits the most — which is the load-carrying region (between the load and the primary fastener). After fiber override sketching, Simulation reveals a predicted Safety Factor of 1.58: which means this part exceeds the strength requirement while using far less fiberglass.
Compared to the same part with fiber in all layers, the cost of each Simulation-optimized part is 37% less with a 44% lower print time. These savings quickly add up with every print job. For example, a production run of 250 optimized parts will yield savings of $1,197 in material costs and 34 days of print time.

Simulation results for the 3 part configurations:

Summary
Eiger’s new fiber override sketching capability reduces material costs by providing more control over fiber placement. This new capability complements the benefits of Simulation. Using them together makes it fast and easy to get a performance-validated part without consuming excessive amounts of time and continuous fiber.
Fiber override sketching is now available for everyone in Eiger. Simulation is a feature available in the Digital Forge Complete Advanced Plan. To learn more about Simulation, contact us.
For additional information on continuous fiber, check out these resources:

Reinforcing 3D Printed Parts with Efficient Fiber Routing: Part 1

Efficient Fiber Routing Techniques Part 2: Advanced Routing Options
All of the blogs and the information contained within those blogs are copyright by Markforged, Inc. and may not be copied, modified, or adopted in any way without our written permission. Our blogs may contain our service marks or trademarks, as well as of those our affiliates. Your use of our blogs does not constitute any right or license for you to use our service marks or trademarks without our prior permission. Markforged Information provided in our blogs should not be considered professional advice. We are under no obligation to update or revise blogs based on new information, subsequent events, or otherwise.
Never miss an article
Subscribe to get new Markforged content in your inbox