
Designing a 3D Printed Tesla Turbine — Part 2
Introduction
This is the second installment of a two part series detailing the retrofitting of a machined Tesla Turbine with Markforged parts. In the first installment, we introduced Tesla Turbines, discussed which parts lent themselves well to 3D printing, and replaced the turbine housing with a Markforged part. Now, we’ll tackle the other printed component of our turbine retrofit: the bearing housing.
The Tesla Turbine Bearing Housing
While the turbine housing surrounds the shaft assembly, it does not touch it. Instead, an intermediary part called the bearing housing bolts onto the turbine housing and holds the shaft assembly with two perfectly concentric bearings. By cantilevering the rotors of the side the bearing housing, the original designers ensured that the machinist turning the original part could easily verify the concentricity of the bearing holes. This is critically important. At 24,000 rpm, any misalignment in the turbine rotors could lead to a catastrophic failure. In the aluminum housing (as it was originally machined), the tolerances for each of these bearing fits was +0/-.0004”. Extremely tight tolerances ensure that the press-fits sit well without being so tight that they impede the rotation of the bearing. While this part is manufacturable on a Markforged machine, it’s a much taller task than the turbine housing.

Additive Manufacturing Design Alterations
While this part is definitely printable, it represents a significantly harder challenge than the turbine housing for a few reasons. First, the bearing fits must be precise and concentric; however, the tolerances can be slightly looser because of the decreased surface hardness of Onyx. This is a blessing in disguise, as hitting a +0/-.001” tolerance is much more realistic than what’s required for aluminum. Second, we needed to be able to print both retaining ring grooves and overhanging flanges precisely. These both required significant support material that could be removed from difficult-to-access areas without marring the part. Thankfully, our peel off supports allow retaining ring grooves and flanges to be easily printed. Third, we needed to fit significant fiber in the parts, especially around the bearings. If the part deformed, then any precision we achieved with bearing fits would be nullified. The part is large enough to fit six rings of fiber around each bearing; this is ample support.

Printing the Housing
Hitting tight tolerances is possible on all of our machines. To prove it, we decided to print two versions of the bearing housing: one on the Mark Two Enterprise and one on the Mark X with laser dimensional verification.
Mark Two Housing
To print tight tolerances on the Mark Two, we have to use independently measured unit tests. We’ve covered unit tests explicitly in a previous blog post; they’re incredibly useful in allowing us to print tight tolerances without a closed loop design. For the bearing housing, we abstract each of the two bearing fits to rings and print multiple unit tests. After each unit test prints, we measure the internal diameter as accurately as possible (measuring internal 3D printed circles with calipers can be quite difficult) and adjust our part dimensions in CAD. After iterating twice with each bearing fit, we incorporate each new dimension into the full part and print it. Only after measuring and validating the full part do we attempt to insert the hardware. If everything works according to plan, the bearings press-fit snugly and we’re able to install the bearing housing onto the turbine housing.

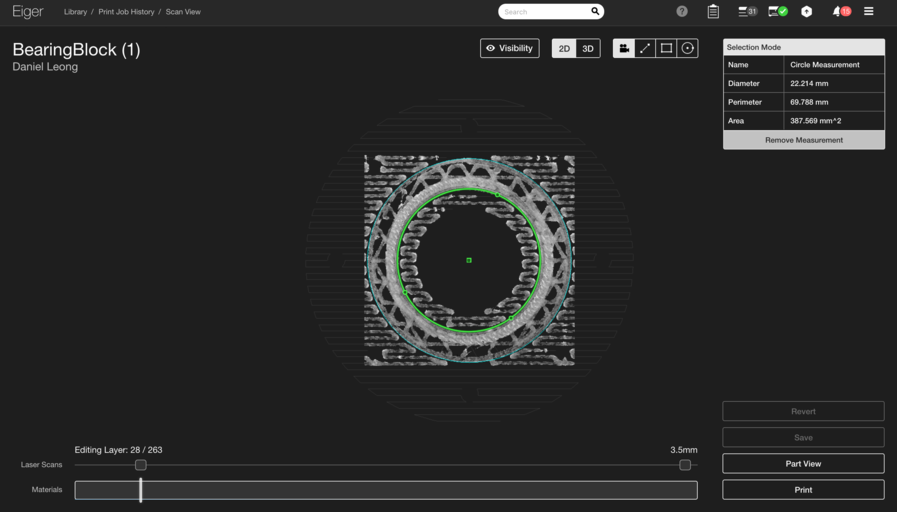
Mark X Housing

Because dimensional assurance on the Mark X is still human validated, we cannot simply print out a perfect part. However, the laser dimensioning greatly streamlines our process. Instead of using unit tests (which while great, still run the risk of not verifying tolerance because the unit test with in-tolerance dimensions still needs to be replicated), we print the whole part with a laser scan on layers that contain each of the two critical bearing fits. This allows us to verify each of the bearing fits during the the print without having to use calipers. While we managed to hit both tolerances on the first try (precluding the necessity of a reprint), missing either tolerance would have resulted in a simple re-dimension and reprint. This workflow is hands-off and much simpler than using unit tests.
Conclusion
While complex, the bearing housing proved to be a great application of tight-tolerance 3D printing. We validated that we could print a functional part with few design changes on both the Mark Two and the Mark X. Better yet, the housings work interchangeably; both allow the turbine rotor to spin flawlessly.

Want to see more applications of Markforged machines like this? Follow us on Facebook, Twitter, Instagram, and Linkedin for more updates!
All of the blogs and the information contained within those blogs are copyright by Markforged, Inc. and may not be copied, modified, or adopted in any way without our written permission. Our blogs may contain our service marks or trademarks, as well as of those our affiliates. Your use of our blogs does not constitute any right or license for you to use our service marks or trademarks without our prior permission. Markforged Information provided in our blogs should not be considered professional advice. We are under no obligation to update or revise blogs based on new information, subsequent events, or otherwise.
Never miss an article
Subscribe to get new Markforged content in your inbox