
The Importance of Design for Manufacturing
What is Design for Manufacturing?
Designing for Manufacturing and Assembly (DFM or DFMA) is a critical part of the product development cycle. It involves optimizing the design of your product for its manufacturing and assembly process, merging the design requirements of the product with its production method. Employing Design for Manufacturing tactics reduces the cost and difficulty of producing a product while maintaining its quality.

Why is Design for Manufacturing Important?
Cost reduction: Around 70% of the manufacturing costs of a product can be derived from design decisions like materials and manufacturing method. The remaining 30% of the costs make up production decisions like process planning and tool selection. Focusing on design optimization reduces the cost of manufacturing.

Streamlined Production Scale-Up: The struggle of hardware development comes from scaling from prototype to production. Considering DFM from the beginning of the product development cycle reduces redesign work, improves product quality, and speeds up your time to market.
Basics of Effective Design for Manufacturing
Standardization: Standardization cuts costs by reducing inventory and scale-up needs. Here are some ways to think about part standardization:
- Design parts that can be reused within a product or shared between product lines.
- Standardize your hardware within your products to reduce inventory needs.
- Make your designs modular to simplify product changes or redesigns.
- Use standard components instead of custom-made ones where you can.

Design Simplicity: Simplifying your design cuts down on the time and inventory needed to make your product, which correlates to its cost. To simplify your product, you can:
- Minimize assembly steps and inventory by making multi-functional parts.
- Use designed-in alignment or quick securing methods like snap fits. Fastening techniques including bolting or glueing take longer to secure and require more inventory.
- Test your improved designs quickly with 3D printed prototypes.
Alignment and Compliance: Errors in alignment can damage parts or equipment, reducing yield or even causing line shutdown. Tweak your designs to account for slop, misalignment, and tolerance stackup by doing any of the following:
- Resolve assembly issues by analyzing how tolerances will stack up in your assembly.
- Design integrated part features to help with alignment during assembly.
- Add tapers or chamfers to guide components during assembly insertion steps.
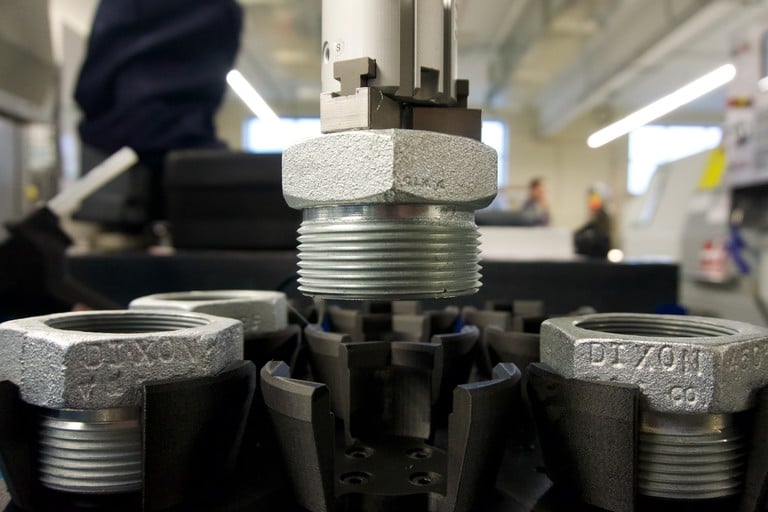
Setup Time Reduction: Reduce setup time by reducing the number of operations required per part, or simplifying assembly steps with 3D printed fixtures and workflow improvements.
- Reduce the number of setups or rotations required per part or assembly.
- 3D print custom workholding to drop setup time and assist workers with alignment, inspection, and assembly.
- Assess where your line could be upgraded with improved tools or workstations.
Where to Start With Design for Manufacturing
Communication: Iteration in product design goes both ways. Work with the people on the factory floor to iterate and improve upon your design, because they’ve often experienced many of the production problems first-hand!
Process: What manufacturing method would be most cost-effective for production? Additive, subtractive, or forming? Well-designed parts should be optimized for their manufacturing process – and can even take advantage of it to further simplify a design. Analyzing the process by which each part is made can lead to simpler setups and operations to reduce part cost.
Materials: Your material choice can impact your cost, part quality, and manufacturing method. What properties does your part require? How many cycles should it last? Are there any weight requirements?
Infrastructure: How is your production line set up and supported? Just as you would optimize a part design for its manufacturing process, you can optimize your production workflow for its manufacturing facility.
How Does 3D Printing Fit in to Design for Manufacturing?
The key value of additive manufacturing as used in DFM lies in rapid iteration and improvement. It increases your productivity by reducing the time and cost to get a part made – whether it’s a prototype, a tool, or a final part.
Prototypes: 3D printing allows for rapid iteration so you can test out many different designs early and often. You can cycle through designs of both your parts and their manufacturing and assembly fixtures to refine the process – make it cheaper, higher yield, and faster.

Tooling: 3D printing your tooling cuts down your production ramp-up time by eliminating lead time constraints for tooling fabrication – making it simple to produce conformal or ergonomic tooling that match the contours of the workpiece. Just as with prototyping, you can quickly iterate through multiple versions of a tool to refine it before implementation on the line.

End-Use Parts: 3D printing, including metal 3D printing, is a viable option for some end-use applications, often due to specific design requirements that render other manufacturing methods cost-prohibitive. It comes with its own set of design guidelines, which can vary depending upon the type of printer used.

Looking for Additive Manufacturing Opportunities:
Look for opportunities both within your product and on your production line to cut down on lengthy lead times and high manufacturing costs. Justify which parts or subassemblies will benefit from 3D printing with Return On Investment (ROI) calculations. Utilize simulation software to validate part performance and optimize print time.
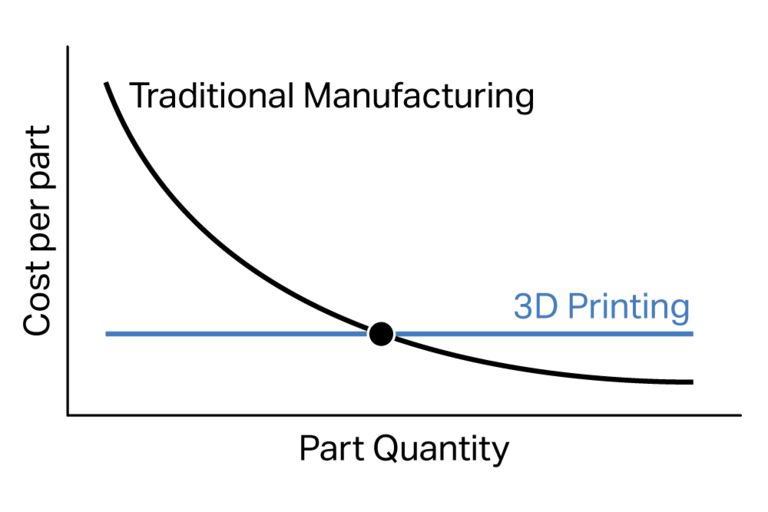
For a given part there is always an inflection point at which other manufacturing methods become more cost-effective. Compare cost-per-quantity and time-per-quantity values to see where your parts in question fall along this curve.
Design for Manufacturing Resources
Understanding is one thing, but applying and implementing design for manufacturing concepts can be difficult, especially in complex factory and industrial settings. Here are a few useful resources that we’ve developed to help out:
- Full composite and metal DfAM guides available in our Learning Library.
- In-depth training and online courses from Markforged University where you can become a certified DFM expert.
Reach out to us for a free consultation on potential applications and how Markforged fits in your business.
All of the blogs and the information contained within those blogs are copyright by Markforged, Inc. and may not be copied, modified, or adopted in any way without our written permission. Our blogs may contain our service marks or trademarks, as well as of those our affiliates. Your use of our blogs does not constitute any right or license for you to use our service marks or trademarks without our prior permission. Markforged Information provided in our blogs should not be considered professional advice. We are under no obligation to update or revise blogs based on new information, subsequent events, or otherwise.
Never miss an article
Subscribe to get new Markforged content in your inbox