
Embedding Nuts in 3D Printed Parts for Hidden Fastener Strength
Most 3D printing plastics aren’t the best for 3D printed threads or even tapped threads in undersized holes because of the material limitations of the parts. Many printed plastics have low material yield strength compared to metals you’d normally find threads in, and the small feature size of most threads means that many printers will have some issues directly printing them. As a result, 3D printed or tapped threads usually wear down pretty quickly, and even with the fiber reinforcement of the Mark Two and X7, the fibers won’t impact the thread strength because of their size. Metal threads are much more precise and have more reliable engagement than plastic threads.
We’ve covered how to get around this previously by adding some metal to your 3D printed plastics with heat-set threaded inserts. The insert melts and reflows the plastic around the part, making it stronger and more secure. However, this may not always be a good option – while inserts do work, they have a few design constraints. The insert must be on the face of a part and its pullout strength cannot be further reinforced beyond the material properties of the plastic surrounding the insert.
There are workarounds for this, however, in the form of overprinting. This technique goes by a few names: overprinting, co-processing, and embedded printing are just a few. The technique is similar to over-molding in injection molding and casting procedures, in which parts are placed into the mold and the plastic or rubber is cast around them. One example would be how scooter wheels are made — the rubber tires are actually cast around the metal hubs.

Overview
We can take advantage of this technique in 3D printing as well – by embedding external components into a print during a pause. This process allows you to make some neat impossible-to-manufacture assemblies. By embedding nuts into 3D printed parts, we can add more material between the bolt and the nut than would be possible with an insert to both hide the nut and increase the pullout strength. We can even reinforce the layers sandwiching the nut further with fiber, allowing for strong, hidden bolt connections within your industrial-strength 3D printed parts. The basic design process for this is designing a cavity the size of the embedded nut you want to add into the 3D printed part, pausing the print just before the top layer of the cavity is printed, adding in your component, and allowing the print to continue.
Design Guidelines:
- Tolerances: When embedding components into 3D printed parts, the biggest thing to remember is the tolerances of your printer. On the Mark Two, leaving a .05-.08 mm gap on all sides gets you a pretty nice close fit for your part. This should be of the measured dimensions of your part, just to be safe. The reported dimensions from a manufacturer will always have their own tolerances! A cavity that is too open won’t engage with the outside of the nut, so you won’t be able to thread a bolt into it. A cavity that is too small, well, you won’t be able to fit the nut into it.
- The Top Surface: The top surface of the part you are embedding is pretty important as well. If the top of the part you’re embedding has a flat face, you’ll probably want to design your part such that the printer will print right on top of it, in which case you may want to lay down some glue on the top of your part. If the top of the part isn’t flat, you’ll need to design a cavity that doesn’t touch the top of your part when printing. Either way, the top surface of the part you are embedding MUST be below the print head as soon as it is placed into the 3D printed part, or else the print head will be sad and may run into it. One of the most important things to remember when designing your part is what face it will be printed from and where the pause will be.
- Support Material: Ideally, you don’t want to use supports when embedding parts because they will get in the way. However, if you have to due to other features in the part, you’ll need to remove them during the pause before you put the nut in, and ensure that no supports will be printing over thin air or on top of the nut once it has been embedded.
- Selecting Nut Type: When it comes to embedding nuts in your designs, square nuts are actually much more suited for this application because they are less likely to strip the inside faces of the cavity if you torque them too hard. However, hex nuts are much more common and well known, so in this guide I’ll primarily be using hex nuts because likely that is what you are familiar with. If you really want to get into this, square nuts would be a good investment.
Embedding Nuts in the XY Plane
1. Designing the Cavity: Designing the cavity for your nut is fairly simple. Once you have your bolt hole designed, measure the dimensions of the nut you are embedding, and CAD in the cavity using the bolt hole as a centerpoint. Usually, I will make a construction plane at either layer that the cavity will begin or end and create a sketch on it.

Next, measure the nut you’ll be embedding and sketch out the cavity. In this case, I’m using an M5 hexagonal nut with a width of 7.85 mm and a height of 3.85 mm. I measured this directly with a set of calipers instead of using the spec sheet, which says it is 8 mm x 4 mm. Instead of entering in the nut dimensions directly, account for tolerances – about .05 mm on each side (so add 2 x 0.05 to get 0.1 for the full diametral tolerance) gives a pretty close fit. That’d give me 7.95 mm width and 3.95 mm height, but I want to play this one safe, so I’m going to give myself a bit more wiggle room and round up to 8 mm width and 4 mm height anyways.

After that, extrude the sketch up by the calculated height dimension and now the cavity is done. You don’t want to fillet or chamfer any of the edges internal to the cavity because that will affect the fit of the part and where the print nozzle goes – for example, if you fillet the ceiling edge of the cavity, once the pause comes, you won’t be able to fit the nut into the cavity!


2. Adding a Pause: In Eiger, you can add a pause after a given layer. First, ensure that you have turned off supports (unless you really need it). You can do this under “Advanced Settings”.

Next, find where in the sliced file the ceiling of the cavity begins, and scroll to the layer BEFORE that. There, you can click “pause after layer” to add the pause.

3. Adding Fiber: To increase the pullout strength of your nut, you may choose to add fiber to your part. You’ll want to add it on the layers above or below your part. This really depends on the direction your bolt will be coming from and how it will be loading the nut. For more info on laying out fiber effectively, check out this series of posts. In the image below, I’ve added fiber to either side of the nut cavities to strengthen the bracket. Fiber can also be added to the layers that make up the sides of the nut to reinforce the walls of the cavity. Stronger walls means a more secure nut that will be less likely to twist itself loose.

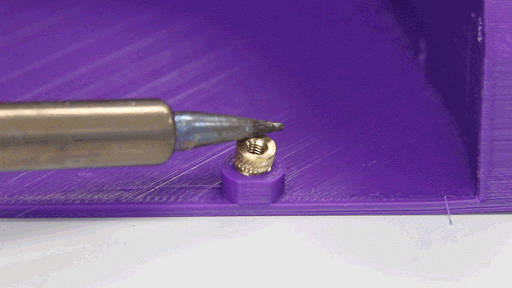
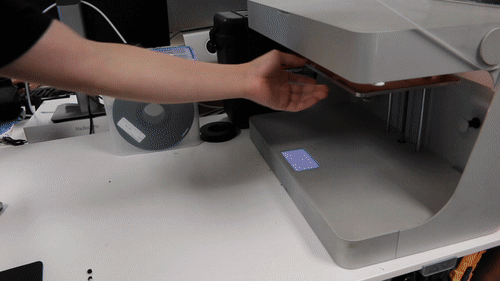
4. Printing the Part: Now it’s time to hit print. fortunately, you can figure out when the printer will pause by looking at the layer details in Eiger, so there’s no need to wait around. Once the pause occurs, just slip your component in and resume the print. If you are concerned about the nylon or Onyx no sticking to the top of the embedded component, just add some of the build plate glue we provide to the top face before you resume the print (however, be careful not to get glue on the print itself – this can cause layer delamination). If you have some nuts that are hard to reach from the front of the printer, no worries! fortunately, the kinematic couplings on the bottom of the build plate snaps back in with 10 micron accuracy, so you can just take the build plate off and pop it back in place once you’ve embedded all of your components.

5. Dealing with Support Material and more complicated geometries (if necessary): If you need to use support material because of other features in your part, then when the print is paused you can pull it out with a pair of needle-nose pliers. However, this only really works if your cavity has a flat ceiling. If you are embedding parts with more complex top surfaces, you may not be able to use support material. You’ll either need to rely on arched or angled overhangs to keep the internal cavity clear, or print a secondary piece to embed with a flat top surface to make removing support material easy. This process is explained below.
Printing Secondary Parts to Embed Nuts on Other Planes
Adding embedded nuts on other planes is possible, but a bit more design consideration is involved so that support removal is easy and so that the nuts remain constrained within the part. To do this, a secondary component must be designed. As an example, I would like to embed a hex nut into this piece such that its axis is parallel to the build plate, as shown in the cross section below. A square nut would be the simple solution to this, because it provides a flat surface to print on, but I am going through for the sake of example. If I leave this cavity as is, the filament will not be able to bridge the gap very well, and any support material in that area will need to be removed.

I could incorporate an angled overhang into the cavity, but that still means I can’t use support material as it will fill in poorly above the nut, and it means the nut will be able to slide within the cavity, making it much harder to secure when threading a bolt through it.

Instead, I can add a secondary part to print, a feature that will secure the nut and provide the printer with a flat top surface to print on. To do this, I make a nut cavity with a flat top:

And then create a small piece that fills in the remaining space in that cavity, leaving a bit of tolerance on the top and sides just to be safe.

This can be printed alongside the main component, so that when the print pauses, I can add in the nut and the secondary component in during the pause, and then the print can continue over the flat top of the secondary printed part, like with this angled square nut below:
Using the same method you can embed nuts at other angles, too, but you need to make sure you have room to slide the nut in. In the cross sectional image below, the small, triangular piece secures a square nut in place at an angle within the printed part:

This technique can allow you to secure nuts at any angle on any plane in 3D printed parts, and it isn’t limited to just nuts either – figure out how embedding nuts and other components is most useful to you, and don’t forget to share it with us on Twitter, Facebook, or Instagram!
All of the blogs and the information contained within those blogs are copyright by Markforged, Inc. and may not be copied, modified, or adopted in any way without our written permission. Our blogs may contain our service marks or trademarks, as well as of those our affiliates. Your use of our blogs does not constitute any right or license for you to use our service marks or trademarks without our prior permission. Markforged Information provided in our blogs should not be considered professional advice. We are under no obligation to update or revise blogs based on new information, subsequent events, or otherwise.
Never miss an article
Subscribe to get new Markforged content in your inbox