
Design for 3D Printing Part 3: Decreasing Print Time
Writer's note: This is the third installment of design for 3d printing. We'll be discussing how you can save time (and material) on plastic 3d printed parts. You can also go back and read Part 1 and Part 2.
Intro
One of the most common criticisms of Additive Manufacturing is its slowness in comparison to subtractive (Rapid) machining. While using additive manufacturing often saves time in the long run (especially in situations where specialized prototyping or significant machining time are required), subtractive machining is objectively faster in some situations with the proper resources. While that problem is more representative of the nature of additive manufacturing, there are several strategies that users can employ to cut down on printing time for plastic parts. In this post, we'll discuss design for 3d printing strategies that save time (and one that doesn't) and how you can implement them in Eiger and with your machine.
What Adds Time to a Print (and How to Avoid It)
To design parts that save time, we need to enumerate what actually adds time to prints. Below, we'll address each of the key time-wasters and why they add time.
Large Surface Area
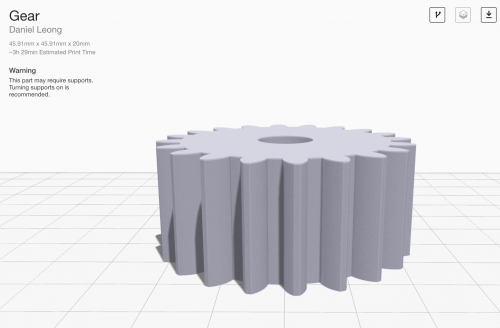
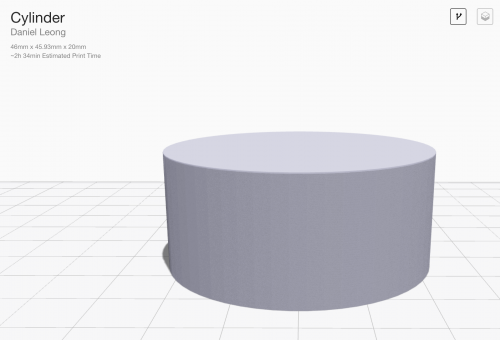
This is the quintessential contributor to increased print time. A large surface area means more part walls to print. Because the print head moves significantly slower on walls than infill, adding more surface area (and thus a longer wall) significantly increases print time. This means that a smaller part with more intricate surface details can take longer to print than a larger, simple part. Take this gear and cylinder, pictured below. The outer diameter on each part is identical, meaning that the cylinder actually contains more material. However, the gear takes nearly 30% longer to print because of its increased surface area. Sometimes, advanced features are required for a successful part; however, in those other occasions simple is always faster.

Support material
Adding support material to your part will increase its print time more than any other factor. Because our support material consists of a long, slowly printed wall, the addition is akin to adding a massive amount of surface area. While support is necessary to print some parts, there are a few steps that you can take to limit the time added due to it.
1. Try a couple part orientations: Often, changing the orientation of parts can drastically change the overall print time. A great example of this is a skiing shinguard that a member of our team printed a few weeks ago. In one orientation, the massive volume under the shell requires huge support structures, yielding a 13 day print. By inverting the part, she cut 11 days off the print time and was able to print the part in a much more manageable two days.

2. Limit overhangs: If the part allows it, printing without supports will yield a faster print. When turned on, our algorithms will support any overhang over 45 degrees from vertical with Onyx (30 degrees for nylon). If you have more overhung areas that you cannot change (and will require support), make sure that your non-critical overhangs do not exceed these values. This will limit the supports placed to the overhangs that need it, while saving you time on other overhangs that don't in your part. If you have no overhangs that need support material, turn off supports and limit angles to 55 degrees for Onyx (or 45 degrees for Nylon). The part will print just fine and save you significant time.
3. Design with a print face in mind: In order to manage which overhangs will need support (and which won't), figure out what orientation the part should print in before designing it. This will allow you to design for 3d printing instead of altering the part to fit the printer. While it may not save print time, it will save design time for the part.
4. Split the part: Sometimes, parts are simply too complex for support-eliminating alterations. In this case, there is still an option. By splitting a part into two or more pieces, you can often limit overhangs much more easily. After the parts are printing, adhere them with Loctite 401 to get a multi-body part as strong as the unibody part would have been.
Layer Height
This is a classic trade off in FFF printing: layer resolution vs. print time. Our default layer resolution of 100 microns produces high quality surface finish. Increasing the layer height to 200 microns sacrifices a little surface finish quality while halving the time of your print. This is extremely helpful for quick and dirty plastic-only print jobs (printing with fiber requires a fixed layer height of 100 or 125 microns), as your parts will come off out of the printer twice as quickly. See the table below for time estimates for varying layer heights on the previously analyzed gear.

Design for 3D Printing
There's an unhealthy trend in Additive Manufacturing: overuse of the technology on parts that do not need to be printed. Consolidating machined and printed parts together into one print can easy, but it will add time to the print. The solution is simple from a timesaving perspective: only print geometries that benefit from being printed. Design for 3d printing: don't print shafts or other parts that are trivial to machine, as it will only add time to your workflow.
Failed prints
This is a more indirect cause of added time; however, it's just as important. Making sure that your bed is properly leveled and that you have enough material for a print can drastically decrease your lead time. Failed prints waste print time as well as material, and limiting them will go a long way towards printing more efficiently. Here are a couple ways that you can limit failed prints:
What Doesn't Help: Adding Speed Holes
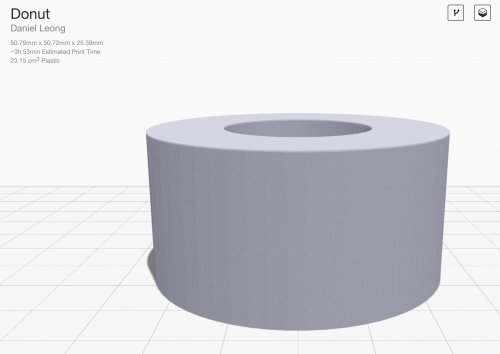
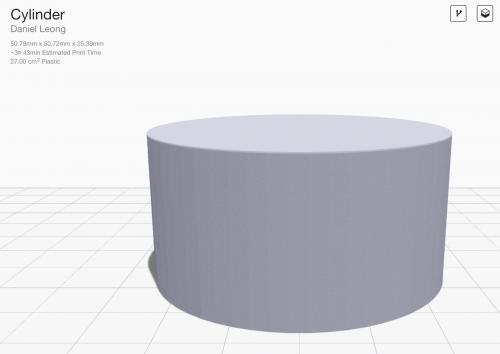
Adding holes to your print may save material, but there's a pretty good chance that they won't save time. Holes often add surface area to your part which (as we've already mentioned) adds time. Take a look at the comparison below. The donut has less material due to the large hole, but takes 10% longer to print.

Conclusion
Saving time on prints is a fickle art: it varies greatly on a part to part basis and doesn't always work as you'd expect. However, by following these strategies you can decrease your print time in most cases.
Want to try this for yourself? Sign up here for a free trial of Eiger, our cloud based slicing software.
Want to see more stuff like this? Follow us on Facebook, Twitter, Instagram, and Linkedin for more updates!
All of the blogs and the information contained within those blogs are copyright by Markforged, Inc. and may not be copied, modified, or adopted in any way without our written permission. Our blogs may contain our service marks or trademarks, as well as of those our affiliates. Your use of our blogs does not constitute any right or license for you to use our service marks or trademarks without our prior permission. Markforged Information provided in our blogs should not be considered professional advice. We are under no obligation to update or revise blogs based on new information, subsequent events, or otherwise.
Never miss an article
Subscribe to get new Markforged content in your inbox