Labeling Your Parts with Engraver Filler
We’ve previously covered painting and dyeing 3D printed parts to achieve a different aesthetic. If you only need to add easily readable lettering or some highlighted trim to your parts, these processes can be a little lengthy. Especially in the manufacturing industry, manufacturers need to label their tooling and fixtures to make them easily identifiable. With similarly shaped parts, labeling your tooling is critical! Below we’ll cover a simple trick to clearly label and finish 3D printed parts using engraver filler. We learned this process from a customer, and we’re excited to share it!

1.Selecting Engraver Filler
If you aren’t familiar with engraver filler, it is used to color etchings and engravings by filling them with a wax substance. One common place you can find it is on bowling balls – manufacturer logos are etched into bowling balls, and engraver filler is used to give the logos color. The engraver filler I used is meant for bowling balls, but it still works on pretty much anything engraved. For tooling and fixtures, the labels need to stand out, so I used the fluorescent coloring.

2. Designing the Engraving
One of the things you need to be careful about is the design of the engraving itself – this you will need to do in the CAD program the part is designed in. The filler will catch and fill the inset sections of the part. This means you need to cut the shape or text into the part model in your design program.

The depth and width of these extrude cuts is important – if the cut is too thick, the filler can rub off easily. If it is too deep, it takes a few passes to fill the crack in correctly. I had the most success with 0.5 mm – 1 mm width and 0.5 mm depth. From a small test sample, at 1.5 mm width and above, the filler was easy to rub off and scratch. Many engraver fillers are neon or fluorescent, so they’re easy to spot even with thin geometries!


3. Print the Part
Print the part out. Engravings work best on the top or side faces of a part during printing. If you have engravings on the bottom of your part, you may want to add a chamfer to the edges of the engraving so that it doesn’t need support material.
4.Fill the Engraving
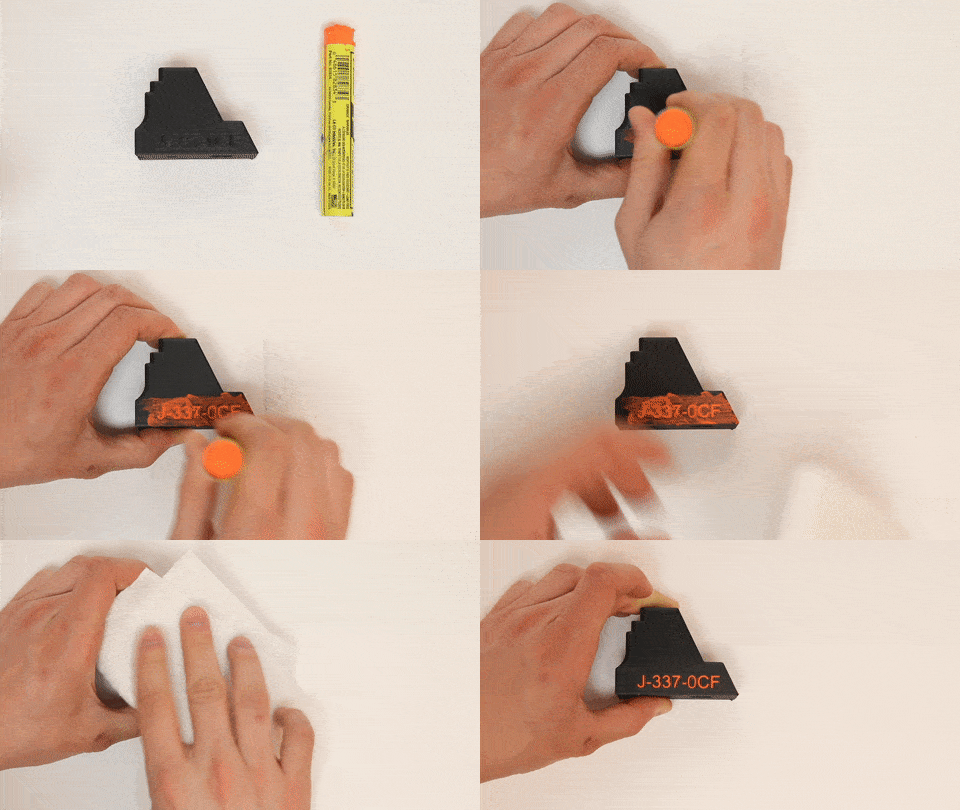
Wipe the tip of the engraver filler stick back and forth across the part you are working with – the surface will cover in engraver filler, but that’s ok – it isn’t permanent. If you wipe across the engraving instead of along it, the material will fill better because it catches on the corners of the engraving.

5.Wipe Excess Filler Off
Get a paper towel and wipe off the engraver filler on the surface. You’ll notice that the filler only sticks when it is within a cavity of the part, so all text and cracks get filled in. In some cases a wet paper towel worked well to remove all excess.


6. Use the Part!
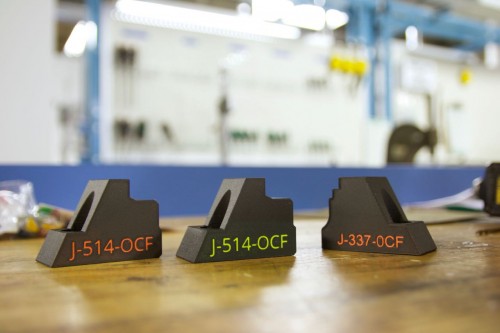
Now your part is complete, and labeled! This method is a very quick and simple way to make anything from text to trim stand out on your part, so has both a functional and aesthetic purpose when it comes to our parts and applications.

7.Some Notes
The engraver filler is a great and simple trick for labeling parts like tooling and fixtures or adding a nice highlight, but in a few cases it doesn’t work very well. The material itself is waxy, so it can wear easily if constantly rubbing against something. The specific marker I used has a temperature of -45C to 60C, so it does not function as well under higher temperatures. This may change depending upon the specific filler you use.
As mentioned earlier, this is a really neat trick we picked up from one of our customers! If you have any tips and tricks you would like to see here, please contact us! If you’re interested in our printers, please order a sample part and see how our parts perform.
All of the blogs and the information contained within those blogs are copyright by Markforged, Inc. and may not be copied, modified, or adopted in any way without our written permission. Our blogs may contain our service marks or trademarks, as well as of those our affiliates. Your use of our blogs does not constitute any right or license for you to use our service marks or trademarks without our prior permission. Markforged Information provided in our blogs should not be considered professional advice. We are under no obligation to update or revise blogs based on new information, subsequent events, or otherwise.
Never miss an article
Subscribe to get new Markforged content in your inbox