
Dyeing Nylon 3D Printed Parts: The Quick and Easy Way
Currently, the Markforged materials suite offers two different types of plastic: Nylon and Onyx. This limits the colors you have essentially to translucent white and matte black, with “highlights” of yellow (Kevlar), pink (fiberglass) or black (carbon fiber). Sometimes you may want your parts in a different color for an aesthetic or professional touch. We’ve discussed the nylon dyeing process in the past, but today we’ll show you an even simpler method to color your 3D printed parts almost any color you want, with just a tea kettle and some dye.
Nylon is a hygroscopic material, meaning that it can easily absorb water (this is why you need to store it in a drybox). This affects the part if the nylon gets wet prior to printing, but won’t degrade the 3D printed nylon part post-printing. Therefore, when nylon absorbs water with a water-soluble dye, it absorbs the water and dye and ends up permanently colored. By heating up some water and adding dye, the dye can easily diffuse into the water, and the combination, when heated, can more easily dissolve into the 3D printed nylon. This allows the part to absorb the dyed water quickly.
Our old dyeing process, if not executed well, could leave parts with bubbles or warped spots, and this method ends up being a lot quicker. Here are the steps we advise:
1. Selecting Dye:
We suggest using RIT liquid dye for dyeing 3D printed nylon parts- although it is listed as a fabric dye, it works really well on our nylon (because nylon is commonly used for fabrics!). If you choose to use another dye, just ensure that it works on nylon. You can purchase RIT liquid dye here. You can choose to dye your parts pretty much whatever color you want as long as you can find it!

2. Preparing the 3D Printed Part:
There isn’t much needed to prepare the part, but just remember to remove the support material, and clean excess glue off of the bottom face of the print, or else the nylon will not absorb dye through that face. In this example, I printed our standard Markforged nylon sample part.
3. Materials:
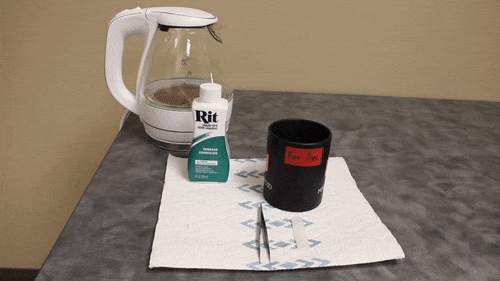
Apart from the dye and the part, you’ll also need a tea kettle and/or a microwave, a container or mug you don’t want to drink from again that fits your part fully inside of it, a pair of pliers or tweezers you can use to pick up your part, and a paper towel (not pictured). It’s best if the container is insulated, like a mug or bowl, so heat doesn’t escape easily. Just make sure you only use it for dyeing and not for drinking after you use it to dye parts, so label it clearly and don’t store it with the rest of your kitchenware!

4. Preparing the Solution:
You’ll want to use about a 5:1 water to dye ratio. For lighter dyes or larger parts though, we suggest a more concentrated solution of about 3:1. Figure out about how much liquid you need to completely submerge the part, and pour just the dye into the container. Boil some water in a kettle or on a stove. Once it’s boiled, pour it carefully into the container with the dye.
5. Dyeing the 3D Printed Part:
Pick the part up with the pliers and submerge it in the dye solution. This is important to do immediately, while the water is still hot, or else the part won’t absorb the dye well. You may want to monitor the temperature of the solution with a thermometer (this one is what some of our engineers use). The dye works best between 60C and 80C. Below 60C, and the dye won’t seep in well. Above 80C, and the part may warp or bubble.

I leave parts in for about a minute, but it’s really up to you: the longer you leave the part in the dye, the darker it will be. Usually, what I’ll do is dip my parts in and pull them out or glance in every few seconds until I get the look that I like. Here are a few examples of red dyed nylon parts left in for different amounts of time:

6. Rinse and Let the Part Dry:
Rinse the part under running water for a bit to clean off any excess dye. then lay the part out on a paper towel, pat it down, and let it dry for a few minutes.
7. Other Tips:
Reusing Dye: The dye is less effective when cool. If the dye has cooled down (which you can check if you have a thermometer, as mentioned above) and you want to reuse it to dye more parts, just take your parts out and reheat the solution in the microwave until it is simmering.
Keeping Dye Hot: If you have a large part and you’re concerned that the solution won’t stay at temperature, using a laboratory hot plate to keep the dye temperature within range will ensure the solution won’t cool down during the process.
Alternative – Using the Microwave: If you don’t have access to a tea kettle, you can dye parts with just a microwave. Instead of heating up the water in the tea kettle, mix the dye and the water in the container first, and then heat it up in the microwave until simmering. Remove the container and dip the parts in as described in Step 6.
Fiber Appearance with Dye: Because fiber layers can usually be seen through the nylon, they also can show through even when the nylon is dyed. If you want to hide the fibers, the part should be dyed a bit darker, but they still show through a little bit. Here are some examples with carbon fiber, our darkest fiber material:

Dyeing Onyx: Our other plastic material, Onyx, does not produce the same results because we are dyeing an already black material. Onyx already has a superb matte black surface finish, so you may not want to dye it anyway. However, after a bit of time, it does give parts an slight colored tinge:

I hope these steps helped simplify the dying process so that you can easily make alternately colored parts. Don’t forget to order a sample part if you want to try dyeing it yourself!
All of the blogs and the information contained within those blogs are copyright by Markforged, Inc. and may not be copied, modified, or adopted in any way without our written permission. Our blogs may contain our service marks or trademarks, as well as of those our affiliates. Your use of our blogs does not constitute any right or license for you to use our service marks or trademarks without our prior permission. Markforged Information provided in our blogs should not be considered professional advice. We are under no obligation to update or revise blogs based on new information, subsequent events, or otherwise.
Never miss an article
Subscribe to get new Markforged content in your inbox